Authentically aging digital media
Last updated 9/25/2018.
A big hobby of mine is making digital art that could fool its audience into thinking it's from the early-to-mid 1990's. You can see a few examples of this in my art expo, especially the blurry GIFs and stillframes with funky fonts or distortion on them.
On this page I'm going to explain my setup and showcase how I get these results!

This setup allows you to record an image or video onto VHS tape, and then to feed the VHS output back into the computer. By playing with the VHS tracking, pausing the output, or fast forwarding / rewinding the tape, interesting distortion effects are possible.
Equipment needed
- A computer capable of multi-monitor output
- 3 free USB ports
- A VCR with RCA inputs and outputs
- VHS tape
- Video editing software
- A video capture card like the Elgato Game Capture HD which I'll be referring to in this article
- An RCA to HDMI converter
- An HDMI to RCA converter
- 2 HDMI cables
- 2 RCA cables
- Optionally, an extra HDMI cable and a second monitor to view the second montior and set up recordings
Note: if your video capture card supports RCA, you won't need an HDMI to RCA converter.
Getting started
First, perform some tests to verify that the HDMI and RCA converters are working properly.
Testing the video capture and RCA-HDMI converter
- Connect the video capture card into the computer and install its drivers and software
- Optionally, connect the HDMI passthrough from the video capture card into a second monitor
- Plug the HDMI and RCA converter boxes into USB power
- Connect the RCA-HDMI converter's output into the video capture card input
- In the capture card software, you should be able to see and record a test pattern
Testing the VCR and HDMI-RCA converter
- Connect the RCA video output of the VCR to the RCA-HDMI converter
- Plug the HDMI-RCA converter into power
- Connect the HDMI-RCA converter's output to the RCA video input on the VCR
- Set the source of the VCR to the line input you used in the previous step
- The preview monitor and computer should be able to see the VCR's output, including a different test pattern generated on the HDMI-RCA converter
Setup the display output on the computer
- Connect an HDMI cable to the input of the HDMI-RCA converter and to a free video output on your computer
- Set up the display settings on the computer to extend the desktop. Don't mirror the desktop, since you'll want to have a free monitor for controlling the recording
- Using the converters that I've linked on this page, ideally the new extended desktop should output at 720p. The HDMI-RCA converter will downscale it, and the RCA->HDMI cable will upscale it again. In my experience this doesn't lead to much of a loss in quality
- At this point you should see the new desktop on your preview monitor and in the video capture card's output
- Center the content that you wish to display on the extended desktop
- Set up the computer's audio output to use the HDMI audio output and play some audio. It should loop back around into the video capture software.
Making the initial VHS recording
Depending on the desired levels of distortion, changing your VCR's recording speed to SP, LP or SLP will give different effects. If your VCR supports VHS Hi-Fi, you'll be able to record audio at near-CD quality. If not, you can get some interesting audio distortion effects as well.
Open a still image, video, or some other application in full screen on the new extended desktop. Insert the tape into the VCR and press record.
Make sure that you leave a gap of at least 10 seconds on the tape before playing videos. When playing back, this allows for time for the on-screen display controls to disappear before footage starts.
Also, leave a 10 second gap after you finish recording too for good measure.
Recording from VHS back to the computer
Press record on the video capture card software. Since you can edit everything down later, it's best to record as much to your computer as possible.
Rewind the tape to where you started recording and play it back. This part is largely up to you, but here are a few different things you can try:
- Pause the tape
- Advance frame by frame or do slow-motion
- Mess with the transport controls. Stop, rewind, or fast forward the tape and pause the tape. You can always isolate these effects later
- If your VCR has a jog-wheel or variable speed controller, use it to go forward and backward in the tape to create a ping-pong loop!
- Mess with the tracking controls slightly. I wouldn't overdo it but a little bit goes a long way
Stop the tape and the video capture when you're done.
Finishing off the project
Once you have a video caputure file, what you do with the file is up to you. Here are a few tips though:
For still images, I use my video editor's "Save Current Frame" export feature (Final Cut Pro X) when highlighting a frame I want to save.
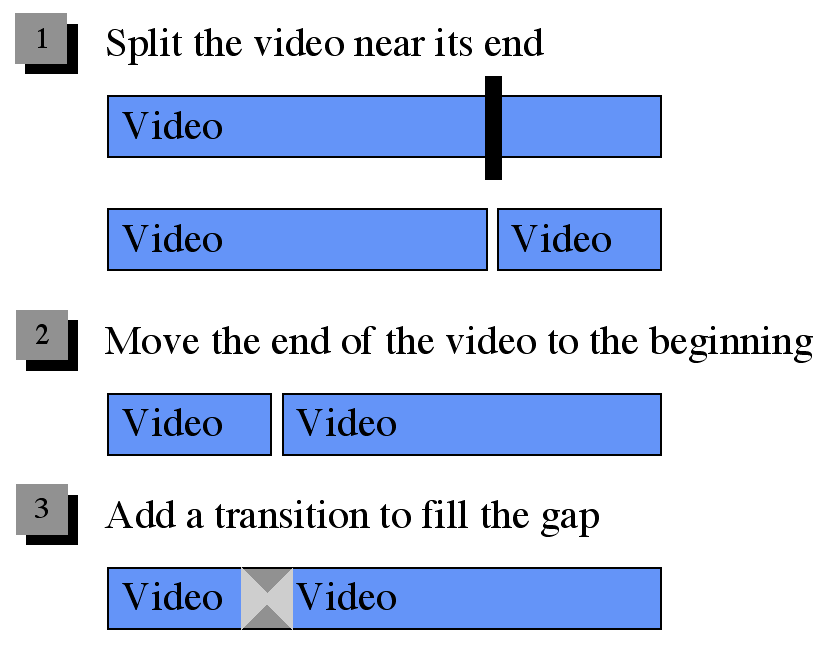
For video loops, I use the following editing technique:

Creating animated GIFs works well for this type of theme too. If you use GIPHY Capture or Compressor 4 your new video loop will be easy to export.