Nonograms Tutorial and Strategy Guide!
Last updated 9/18/2018.
Table of Contents
- What are nonograms?
- Example of a nonogram
- Completing your first puzzle
- Using edges to your advantage
- Practice! (Part 1)
Coming soon:
- Finding a place to progress
- Resources and helpful links
What are nonograms?
Nonograms, also known as Japanese crosswords, Picross, paint-by-numbers, etc. are picture puzzles that start off with an empty grid and finish revealing a hidden picture. To solve them, every row and column are marked with a series of numbers identifying the number of filled cells contained within.
There are different types of nonogram puzzles, including single-color, multi-color, and even 3D variants. Nintendo has popularized nonogram video games under the Picross name, originally published on the Game Boy as Mario's Picross, but Nintendo didn't originanate the idea and isn't the exclusive publisher of the form. You can find nonograms in puzzle books, weekly newspapers and on phone apps and websites.
In this article, I'll be discussing single-color nonograms.
Example of a nonogram
Here's a very simple example of a (finished) nonogram. Of course, you'll start with a blank grid:
Completing your first puzzle

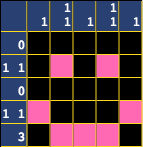
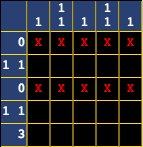
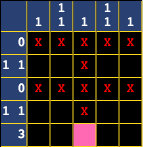
Each row and column in the puzzle show how many filled squares are in it. Take the first and third rows for example, they both have the number 0. That means that no cells are filled in these rows. When solving nonograms, it's best to mark these cells out with an X so that you know they won't be filled.
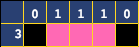
The next step is to look for spaces that can be filled. Let's start with the row of 3 on the bottom. Each number over 0 represents a contiguous block of one or more filled cells. Looking at just this row, you'll see that there are three different places this block can go:


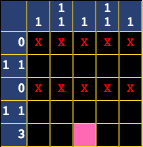
No matter where you put this block, one square is always going to be filled, which is the one in the middle. Let's put that in now.
Now that we've filled in this cell, we've also solved a column! The third column is complete, since the 1 identifies that there's only one cell in the column. We'll X out the rest.
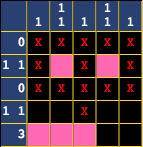
Now, let's look at the second and fourth columns which each are identified by 1 1.
There are two places where the cells can be filled here. Since there are two hints in these columns, it means that there must be a gap of at least one space between each block.
That means that the bottom cells can't both be filled in, but the top cell always need to be. Let's fill those in now.
And because of that, we've solved the second row! Let's X out the rest of the cells in that row.
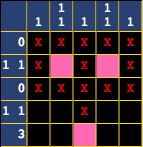
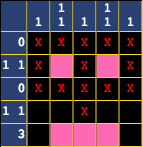
We're almost there! You might be wondering how to continue, since nothing really stands out. It's at this point that we need to apply some logic.
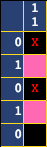
Suppose we were to decide that the 3 were to go here:

You would eventually get into a situation like this, where you wouldn't be able to continue.
The puzzle can't be solved in this state, as anything further that we fill in will violate the rules. The 3 block can't be added to, and the 1 1 block needs to have a gap.
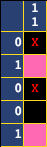
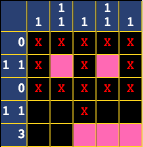
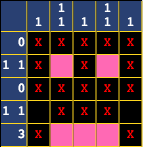
Similarly, if we were to do this:

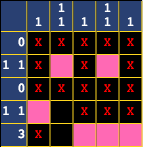
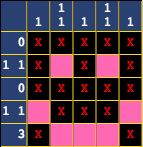
We'd run into trouble as well on the other side. Therefore, the only place the 3 block can go is right in the middle.
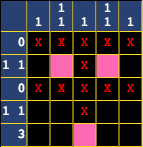
And we've finished both the 1 1 columns and the 3 row. Let's X 'em out.
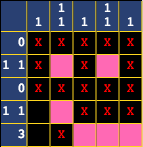
Finally, the only remaining cells will finish off the 1 columns and the 1 1 row!
We're done!
Using edges to your advantage
Let's try a bit of an unorthodox puzzle now. Normally, you'll have both row and column hints, but can you use just one hint to fill in some detail? Consider the following column:

This puzzle is unsolvable as is, since I've left out the row hints. You can still fill in at least one cell.
Let's look at where the two and four blocks might go, placing them together at the top of the column.


Slide the four block down to the bottom and you'll see, no matter where we place the four block, one block is always filled!
Another example
Here's another row. Let's find out what we can do with it:

Marking everything out from the top edge and the bottom edge with a single cell gap will give you your answer:


Let's step back and break down why this works. If you line up blocks with a one-cell gap from each edge and a block overlaps with itself, it must go in the space where it overlaps.
You are effectively shrinking the grid. The 3 block must be contained in a 4-cell space since it's blocked on both sides by a 1 and a 1 1 block.
Practice! (Part 1)
Try a few practice puzzles below! These puzzles work best on a desktop computer since they rely on the mouse. Left clicking will fill a square, and right clicking will X it out. You can see the solution by clicking "Show Answer".
Good luck!